If you’re a seasoned Power Automate user, no doubt you’ve encountered performance bottlenecks with bulk CRUD operations against a data source. Using Apply to Each loops can be slow and consume precious API calls per action. This is compounded when the operation involves a large volume of data. This post will discuss how to make use of the Batch API requests with Dataverse to significantly speed up these operations — often down to just one API call! It’s a more advanced but extremely powerful technique of interacting with Dataverse.
In my fictitious examples, I will be working with a dataset of employees in excel to bring into the contacts table. I’ll start with bulk create, then upsert based on a key value (Employee ID). Finally, I’ll do a parent child relational deep insert of tasks for a contact.
Create the HTTP Connection
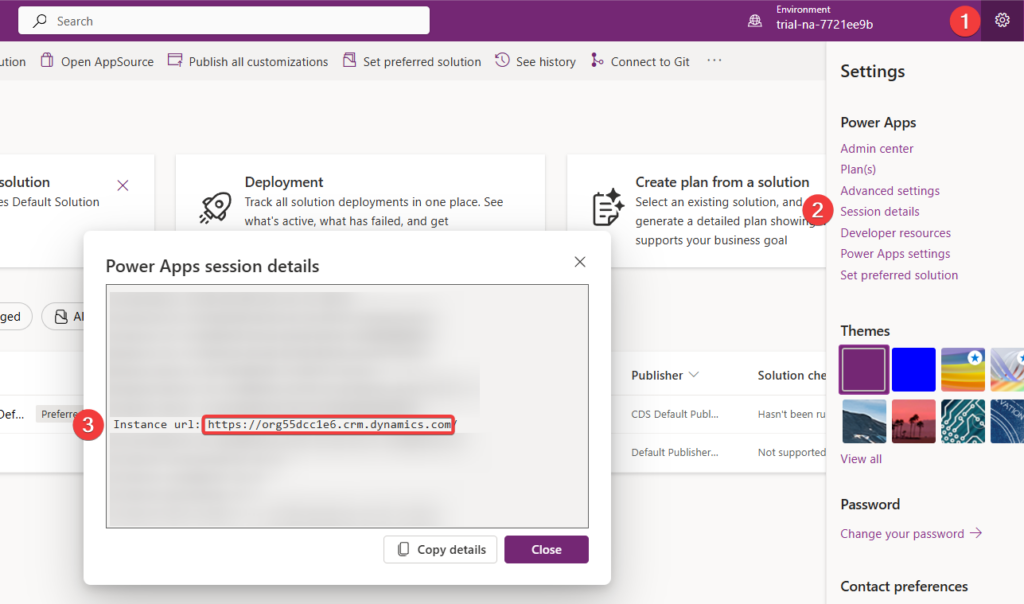
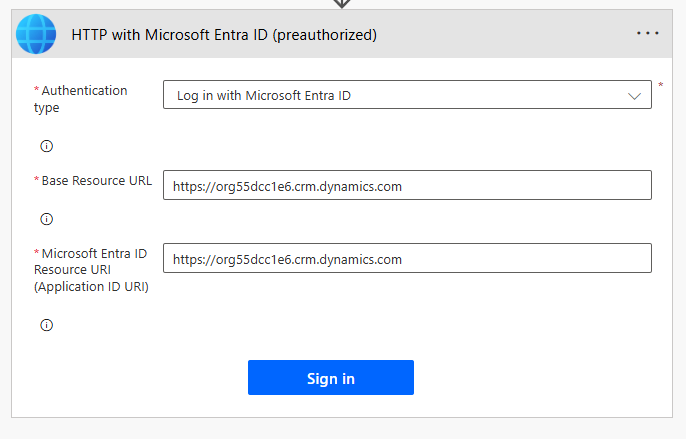
To make the batch call, we need to create an HTTP connection to reference the environment. First, go to the gear icon, select your environment, Session Details, and copy the “Instance URL” without the backslash at the end. In Power Automate, find the “HTTP with Microsoft Entra ID (preauthorized)” connector and select “Invoke an HTTP Request.” We need to create a new connection. Leave the Authentication Type as-is. Paste this in for both the Base Resource URL and Microsoft Entra ID Resource URI (Application ID URI), then click Sign In.
Scenario 1: Bulk Create
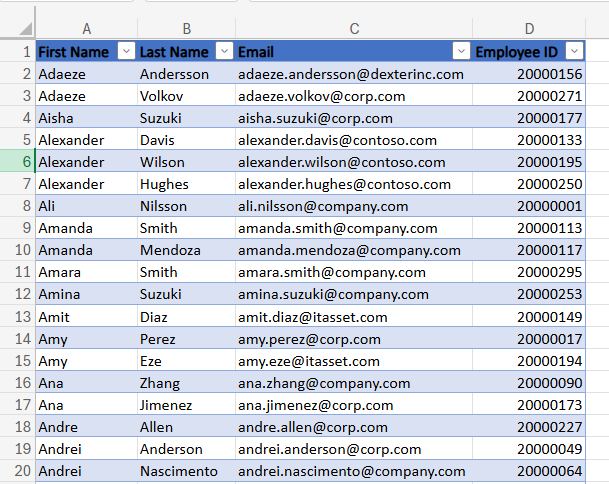
I’m using an excel file for my employees to create in contacts.
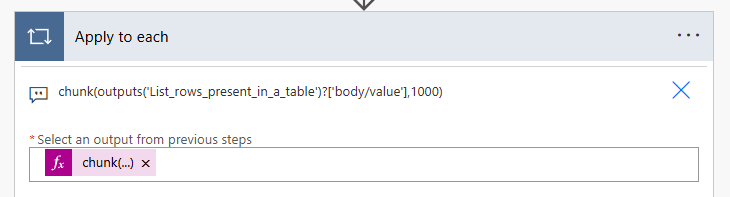
The batch API can handle up to 1000 entries per batch, therefore we’ll use the chunk function to loop through each batch. For example, if you had 3100 items, the function would chunk this into 4 batches (3 * 1000 plus the remaining 100 for a total of 4) and loop 4 times.
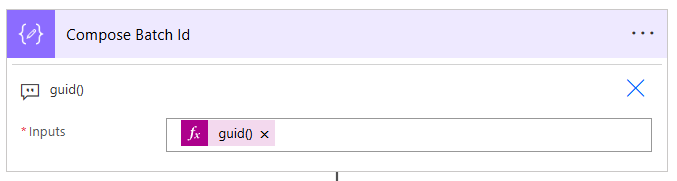
Within the Apply to Each Loop Every batch request needs to have a unique id associated with, so using the guid(), we can generate one in a compose action.
On of the most challenging parts and where errors can come up, is in the data shaping. We need to select the current batch in the loop with the select action, change the mode to map. Using the concact function, we construct the batch line, the required spacing, the headers, and the changeset. After the content-id and space, this is where we’re specifying the type of request this is (POST), what table we are hitting (contacts) note it’s the entityset (plural name) of the table) and further header details
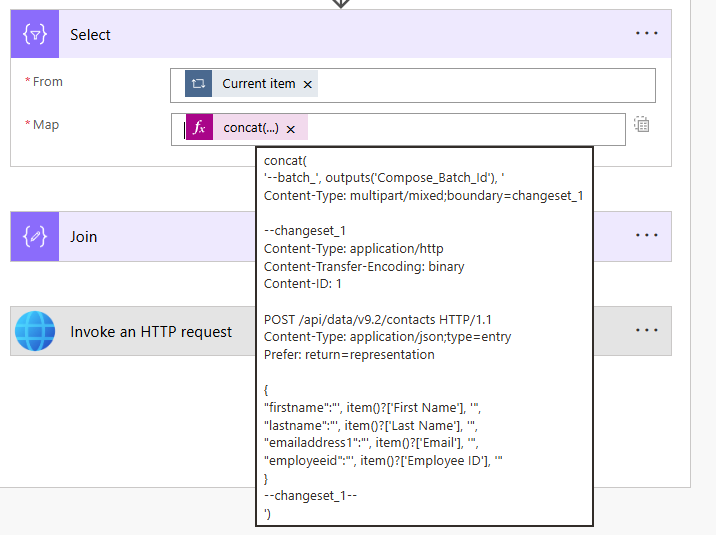
After another hard return, we have the body itself. This is the array of objects with the contact columns and corresponding values from the excel.
concat('--batch_', outputs('Compose_Batch_Id'), '
Content-Type: multipart/mixed;boundary=changeset_1

--changeset_1
Content-Type: application/http
Content-Transfer-Encoding: binary
Content-ID: 1

POST /api/data/v9.2/contacts HTTP/1.1
Content-Type: application/json;type=entry
Prefer: return=representation

{
"firstname":"', item()?['First Name'], '",
"lastname":"', item()?['Last Name'], '",
"emailaddress1":"', item()?['Email'], '",
"employeeid":"', item()?['Employee ID'], '"
}
--changeset_1--
')
Prefer: return=representation will return a response with the created column values including the contactid in this case. You can use this later to further process a record after creation.
The column names need to match the logical names in the table which will always be all lowercase
It’s important to close out the request with the changeset line.
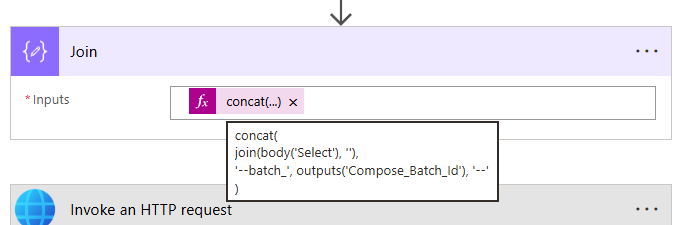
After select, we need to join on the batch line
Finally! We are ready to send the request to the API. Using the HTTP Invoke a Web Request from the preauthorized connection make earlier provide the following for the headers. Note it requires the batch guid we generated earlier. This example also includes other optional headers, such as Prefer: odata.continue-on-error. This means if the any one of the batch items fails, the whole batch process continues on (default without this header would halt further processing)
The body passed is the results of the Join compose from above.
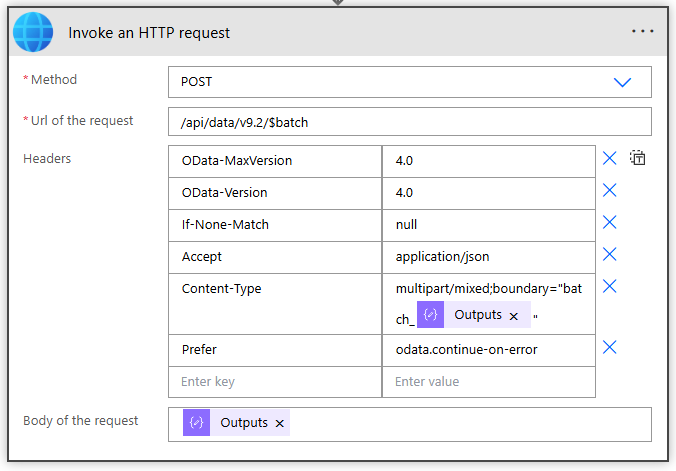
If you receive an error on the HTTP Request, it could likely have something to do with body payload. Take care to create your concat expression noting the hard-return spaces provided in the example above. It can also be a malformed body with the wrong column names. Make sure you’re using the column logical names.
Scenario 2: Bulk Upsert
For the upsert scenario, I created a key value on the Contacts table for the employee column. This enforces data integrity that each employee must have a unique id. In this case, I now have those employees created in the table, and I’m updating them. I can even add new ones to the array and this type of record will handle creation as well as updating existing (hence the upsert!) With the key in place, there’s just a few changes to make the in the select concat action.

The POST action becomes a PATCH and we need to add (employeeid =”’item()?[‘Employee ID’], ”’). And that’s it! The Batch API automatically creates a new record when the employee ID isn’t found, and updates the existing one when it is.
concat(
'--batch_', outputs('Compose_Batch_Id'), '
Content-Type: multipart/mixed;boundary=changeset_1

--changeset_1
Content-Type: application/http
Content-Transfer-Encoding: binary
Content-ID: 1

PATCH /api/data/v9.2/contacts(employeeid=''', item()?['Employee ID'], ''') HTTP/1.1
Content-Type: application/json;type=entry
Prefer: return=representation

{
"firstname":"', item()?['First Name'], '",
"lastname":"', item()?['Last Name'], '",
"emailaddress1":"', item()?['Email'], '",
"employeeid":"', item()?['Employee ID'], '"
}
--changeset_1--
')
Scenario 3: Create a Primary and Child Records in One Request
This next one is tricky to set up, but nonetheless very powerful. In addition to creating a new record, we also want to associate related records with the parent. For example, create a contact record and also associate four task records with it. We want to do this in one go — not first create the contact and then create the tasks. This method is known as a “deep insert” request, where the request sent is atomic. This means it’s sent as one unit: if just one of the requests within the unit fails then it all fails.
I have a set of employees in my array which are part of contoso. For those employees only, I am going to create their contact record and create 5 tasks related to their contact record. The tasks are in an array shown below.
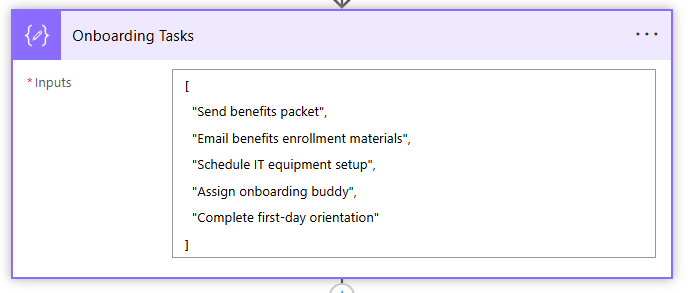
As I go through the apply to each batch, I shape the tasks array buy adding the subject and scheduledend columns into a select (these are the logical names for the Subject and Due Date columns in the tasks table).
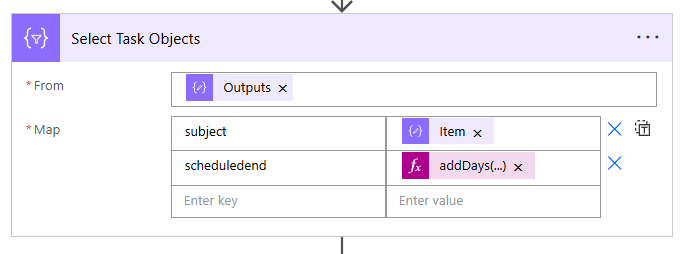
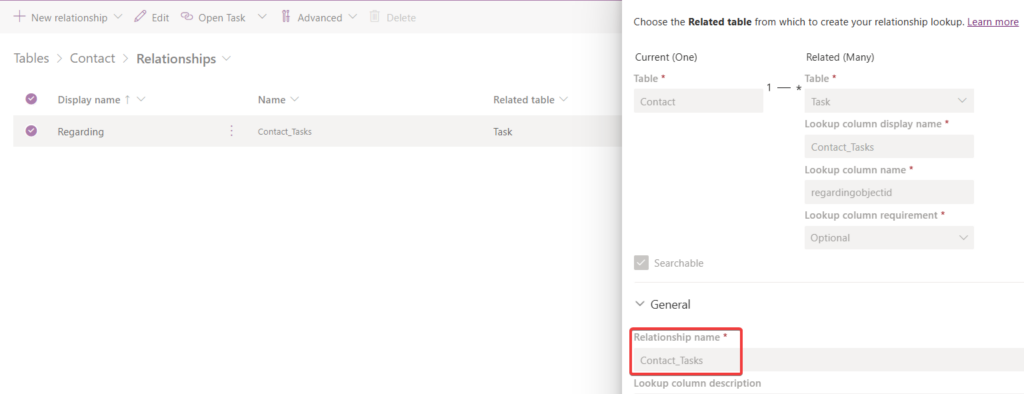
The select concat line again is what changes. It mirrors the bulk create with one crucial add in the body. Using the relationship name between contacts and tasks (known as Contact_Tasks), I pass a stringified array of tasks from my previous action into the payload.
concat(
'--batch_', outputs('Compose_Batch_Id'), '
Content-Type: multipart/mixed;boundary=changeset_1

--changeset_1
Content-Type: application/http
Content-Transfer-Encoding: binary
Content-ID: 1

POST /api/data/v9.2/contacts HTTP/1.1
Content-Type: application/json;type=entry
Prefer: return=representation

{
"firstname":"', item()?['First Name'], '",
"lastname":"', item()?['Last Name'], '",
"emailaddress1":"', item()?['Email'], '",
"employeeid":"', item()?['Employee ID'], '",
"Contact_Tasks": ', string(body('Select_Task_Objects')), '
}
--changeset_1--
')
I know the relationship name is Contact_Tasks because the Contacts table defines it in its relationships section.
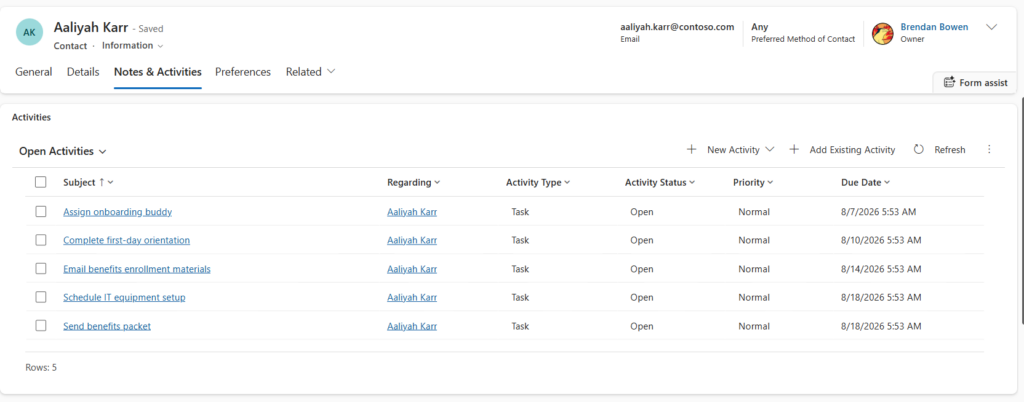
And that’s it! If we open an application which has a Contact Main Form available, under notes and activities, we can see the related activities (Tasks) added for the employee! Really cool!